
While developing the Chongdae Market Android app, I needed to implement Kakao social login. It was my first time working on a social login feature, and before I started, I didn’t quite understand how it was implemented. But I wanted to understand the social login flow and learn how our service verifies users and manages user information. So, I told my team I wanted to take on this part—and they agreed! 
As expected, many challenges awaited me. It was a process that took a lot of time and effort, so I’d like to record the difficulties I encountered and the new things I learned in a blog post!
1. Why use social login?
There seem to be two main ways to log in to a service. The first is by entering an ID and password, and the second is by using social login options like Kakao, Naver, or Google. Before the rise of social network services, most services used the first method. However, recently, more and more services are adopting social login. Why is that?
Signing up with an ID and password to provide user information to the service and log in has two major issues.
1.
From the user's perspective, it's inconvenient. They need to remember their ID and password and re-enter them each time they log in.
2.
Users may find it difficult to trust the security of the service.
The inconvenience of the first issue is manageable, but the second can lead to critical problems. This is especially true for small-scale services developed as projects by individuals or students. Without security experts or advanced security measures, can users really trust these services with their personal information? To address this issue, most projects use OAuth!
What is OAuth?
OAuth is an open standard for access delegation, allowing internet users to grant websites or applications access to their information on other websites without providing a password. It provides a common method for granting access securely.
Simply put, it allows developers to entrust the security of their service to a reliable external service rather than managing it themselves.
In Korea, widely used services like Kakao and Naver are frequently utilized for OAuth. Since the majority of Koreans already use KakaoTalk, we decided that implementing Kakao social login for Chongdae Market would be an effective way to cover nearly all users
2. Understanding the social login process
Since we decided to use Kakao social login, I needed to understand the process of signing up and logging into Chongdae Market via Kakao. Up until now, whenever I used Kakao social login on a service, I just assumed it automatically registered me with my Kakao ID and password and logged me in—but that wasn’t the case… haha.
I studied the social login flow by referring to many blogs. At first, I didn’t understand much from reading, but as I tried it out myself, things started to click! Generally, Kakao social login works as follows.
Generally, Kakao social login works as follows. 1.
The client logs in with their Kakao account to obtain a Kakao Access Token. If the user has provided consent for personal information sharing during this process, Kakao will provide information, including the user's basic details (nickname, gender, email, etc.), which can be used by Chongdae Market.
2.
The client sends the obtained Kakao Access Token to the Chongdae Market server.
3.
The Chongdae Market server communicates with the Kakao server using the Kakao Access Token and retrieves user information from the Kakao server.
4.
The Chongdae Market server creates a Chongdae Market account corresponding to the user information received from the Kakao server and generates a Chongdae Market Access Token for that user. This Chongdae Market Access Token is sent back to the client. If this process is completed successfully, the login is considered successful.
5.
Afterward, the client sends the Chongdae Market Access Token received from the server with every server communication, and the server verifies who the currently logged-in user on Chongdae Market is using this Access Token.
One important point to note is that the Kakao Access Token and the Chongdae Market Access Token are different! (This was a very confusing part..) The Kakao Access Token is only used by the Chongdae Market server to communicate with the Kakao server and is not used for verification between Chongdae Market and the client. The verification of who the currently logged-in user is done using the Access Token generated by Chongdae Market.
(This was a very confusing part..) The Kakao Access Token is only used by the Chongdae Market server to communicate with the Kakao server and is not used for verification between Chongdae Market and the client. The verification of who the currently logged-in user is done using the Access Token generated by Chongdae Market.Additionally, for security reasons, the validity period of the Chongdae Market Access Token is set to a short 30 minutes. This means that after logging in to Chongdae Market, the user will need to log in again after 30 minutes, which can be inconvenient. To solve this issue, there is something called a Refresh Token.
The Refresh Token is held by the client and sent to the server when the Access Token expires. The server then verifies the Refresh Token to identify the user and reissues the Access Token for that user. The client can then communicate with the server using the newly issued Access Token!
Writing this down, it seems quite complicated.. LOL It took me a long time to understand it.
3. Implementing Kakao Social Login
Now, I will write about how I actually implemented Kakao social login!

I followed the official Kakao login documentation. However, there were many parts that I didn't understand even after reading the official documentation, so I referred to various blog posts and YouTube videos.
It can be implemented in two main steps:
1.
Register an app on the Kakao Developer Console (Kakao Developers).
2.
Use the Kakao SDK in our app.
3-1. Register an app at kakao developers
First, to use Kakao social login, there are things that need to be registered on Kakao Developers. This process prepares for using the Kakao SDK and involves granting permissions. You can proceed with it at the link below!

1) Register App
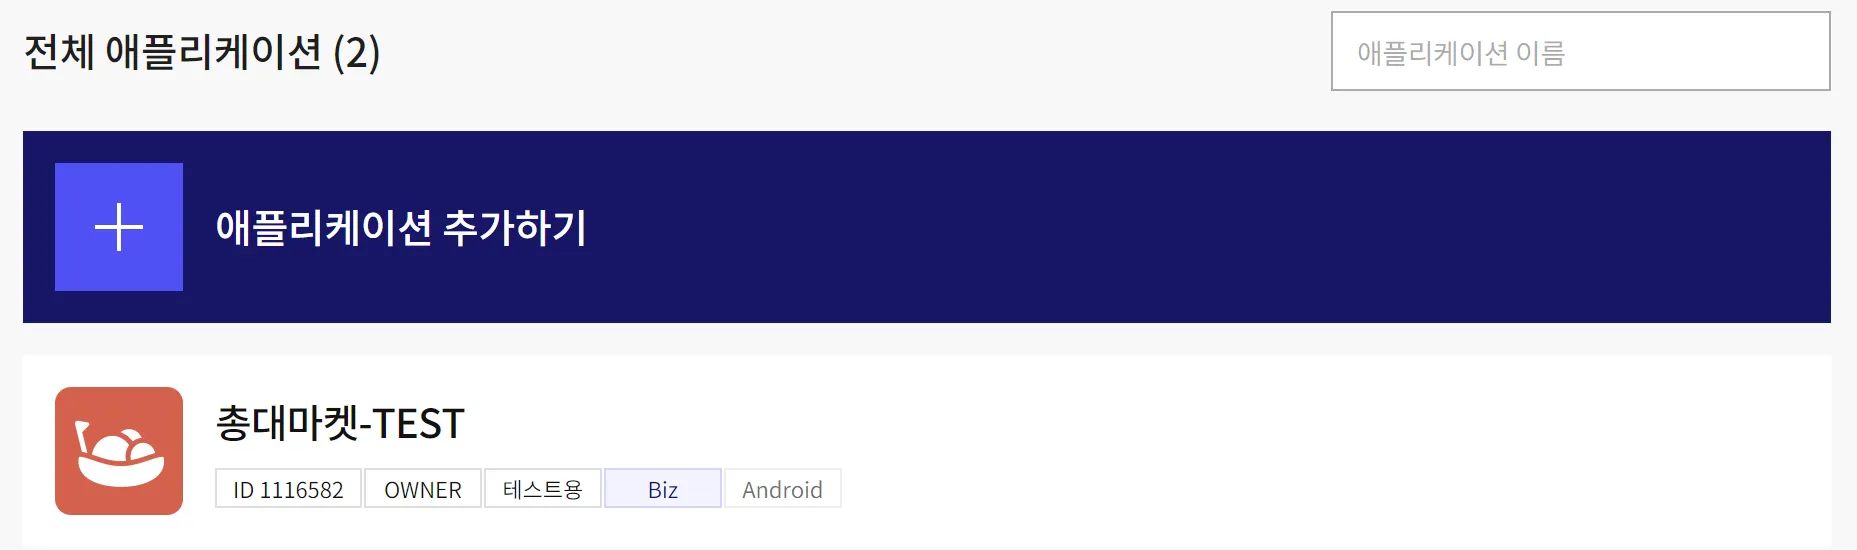
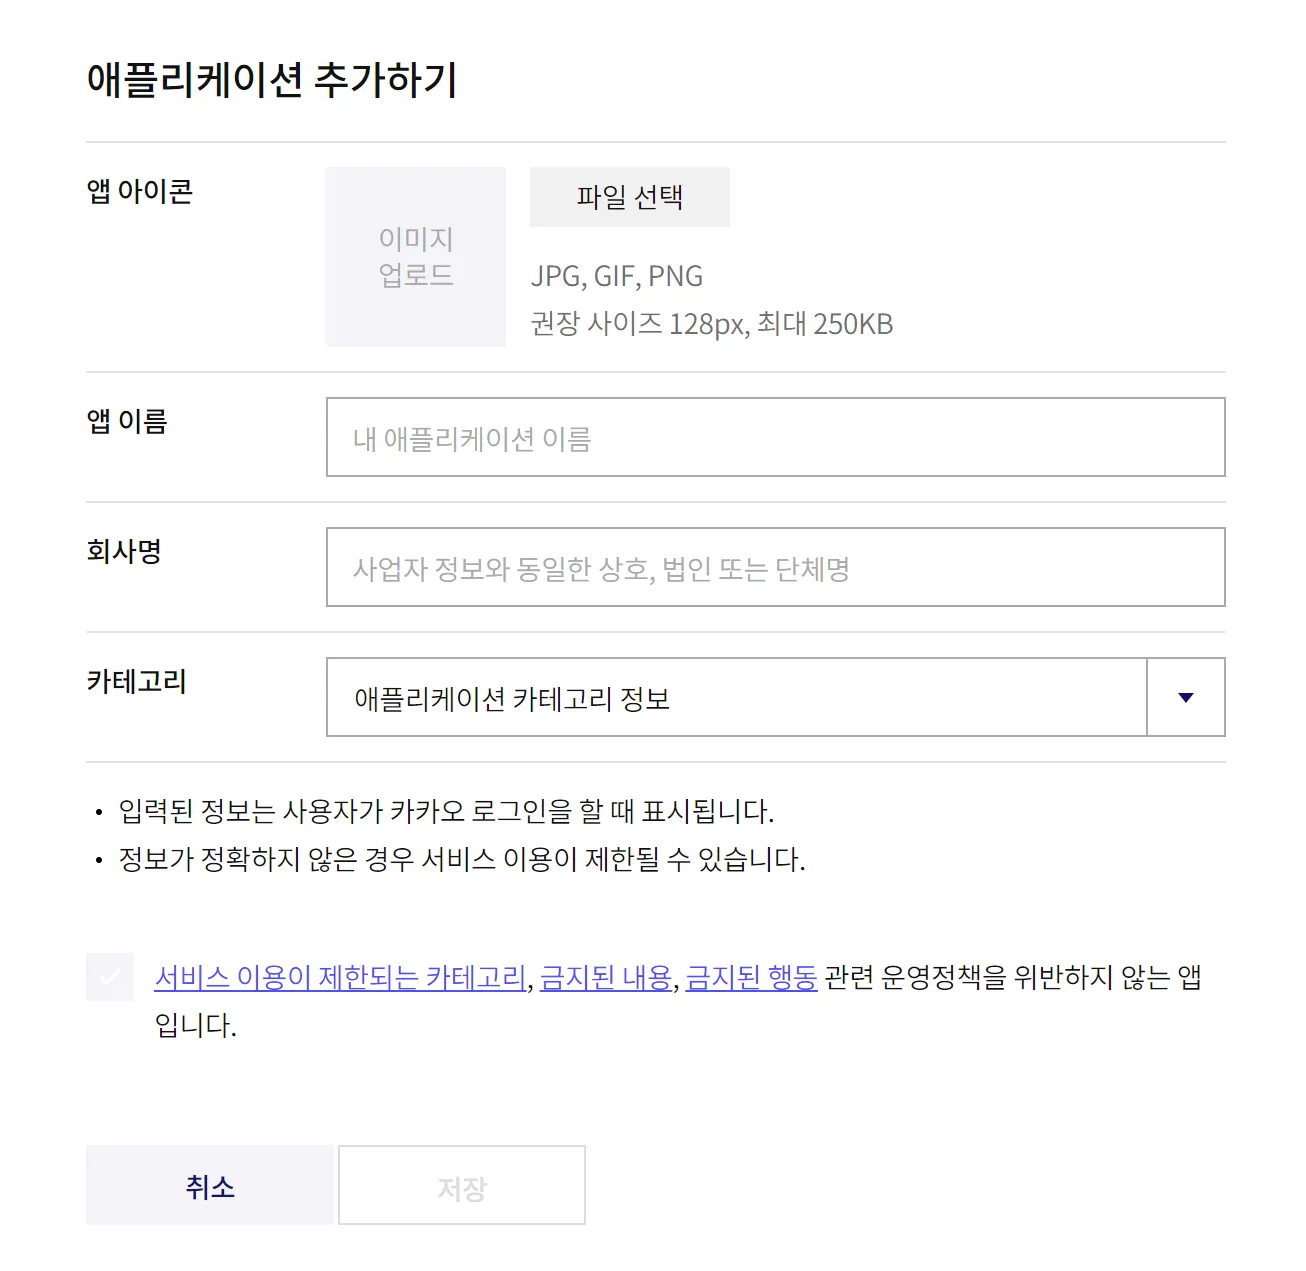
Go to the "My Applications" tab and register the information for our app.
2) Issuance of Kakao Native App Key
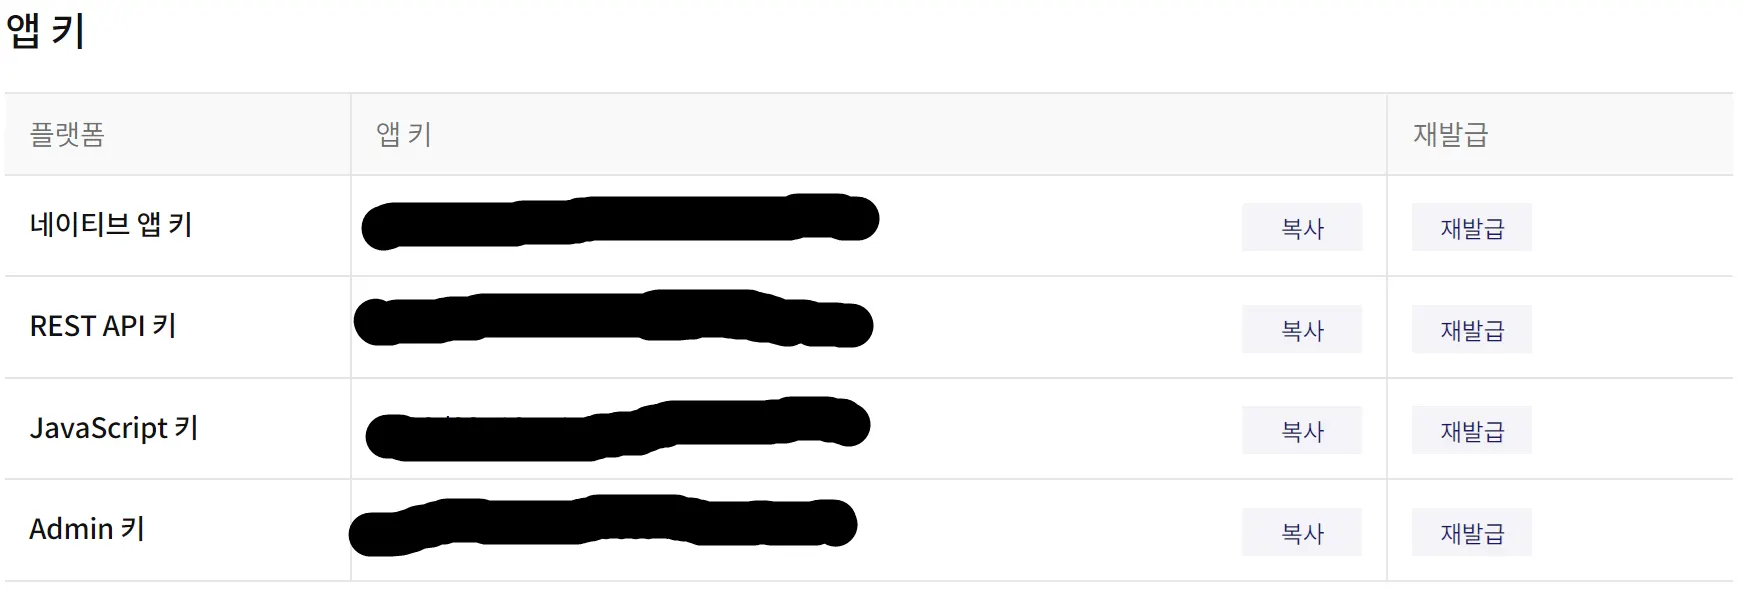
Once the app is registered, you can obtain the Native App Key in the App Settings > App Key tab. This key is used to initialize the Kakao SDK. (Important! Since this key must be managed privately, it should be stored in local.properties and added to .gitignore. I made the mistake of uploading this to the Git remote repository at first... Fortunately, it was just a test app. )
)The Kakao SDK is a collection of tools created by Kakao's developers that allows us to easily use various services and features of Kakao in our app. With it, we can easily implement social login and utilize Kakao APIs in our application!
3) Register Key Hash
Once completed, go to the App Settings > Platform tab and register the Key Hash.
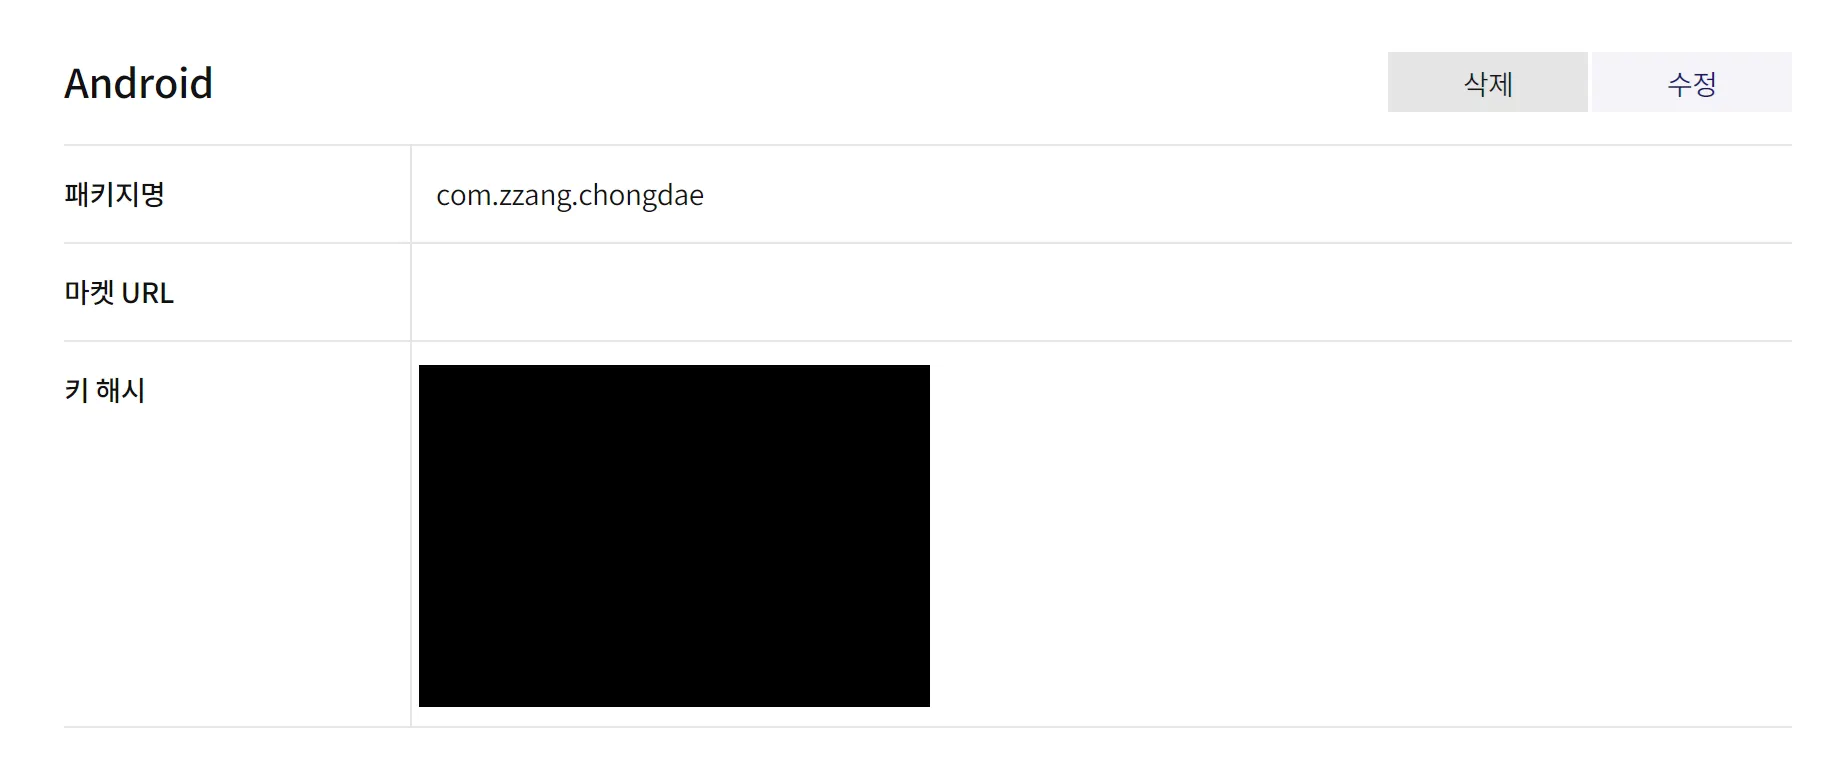
This Key Hash is used to identify the app when it calls the Kakao API using the Kakao SDK. In other words, only apps with registered Key Hashes can use the Kakao SDK.
The Key Hash varies for each team member's Android Studio project, and only the app built from the project of the person who registered the Key Hash can perform Kakao login. Therefore, all team members needed to extract their Key Hashes and register them here. (However, to be honest, I still don't fully understand what Key Hash is, so I plan to study it in detail later!)
4) Setting personal information consent items (optional)
When you want to use not only the Kakao Access Token but also additional user information during Kakao social login, you can go to Product Settings > Kakao Login > Consent Items to configure the settings for obtaining the desired personal information.
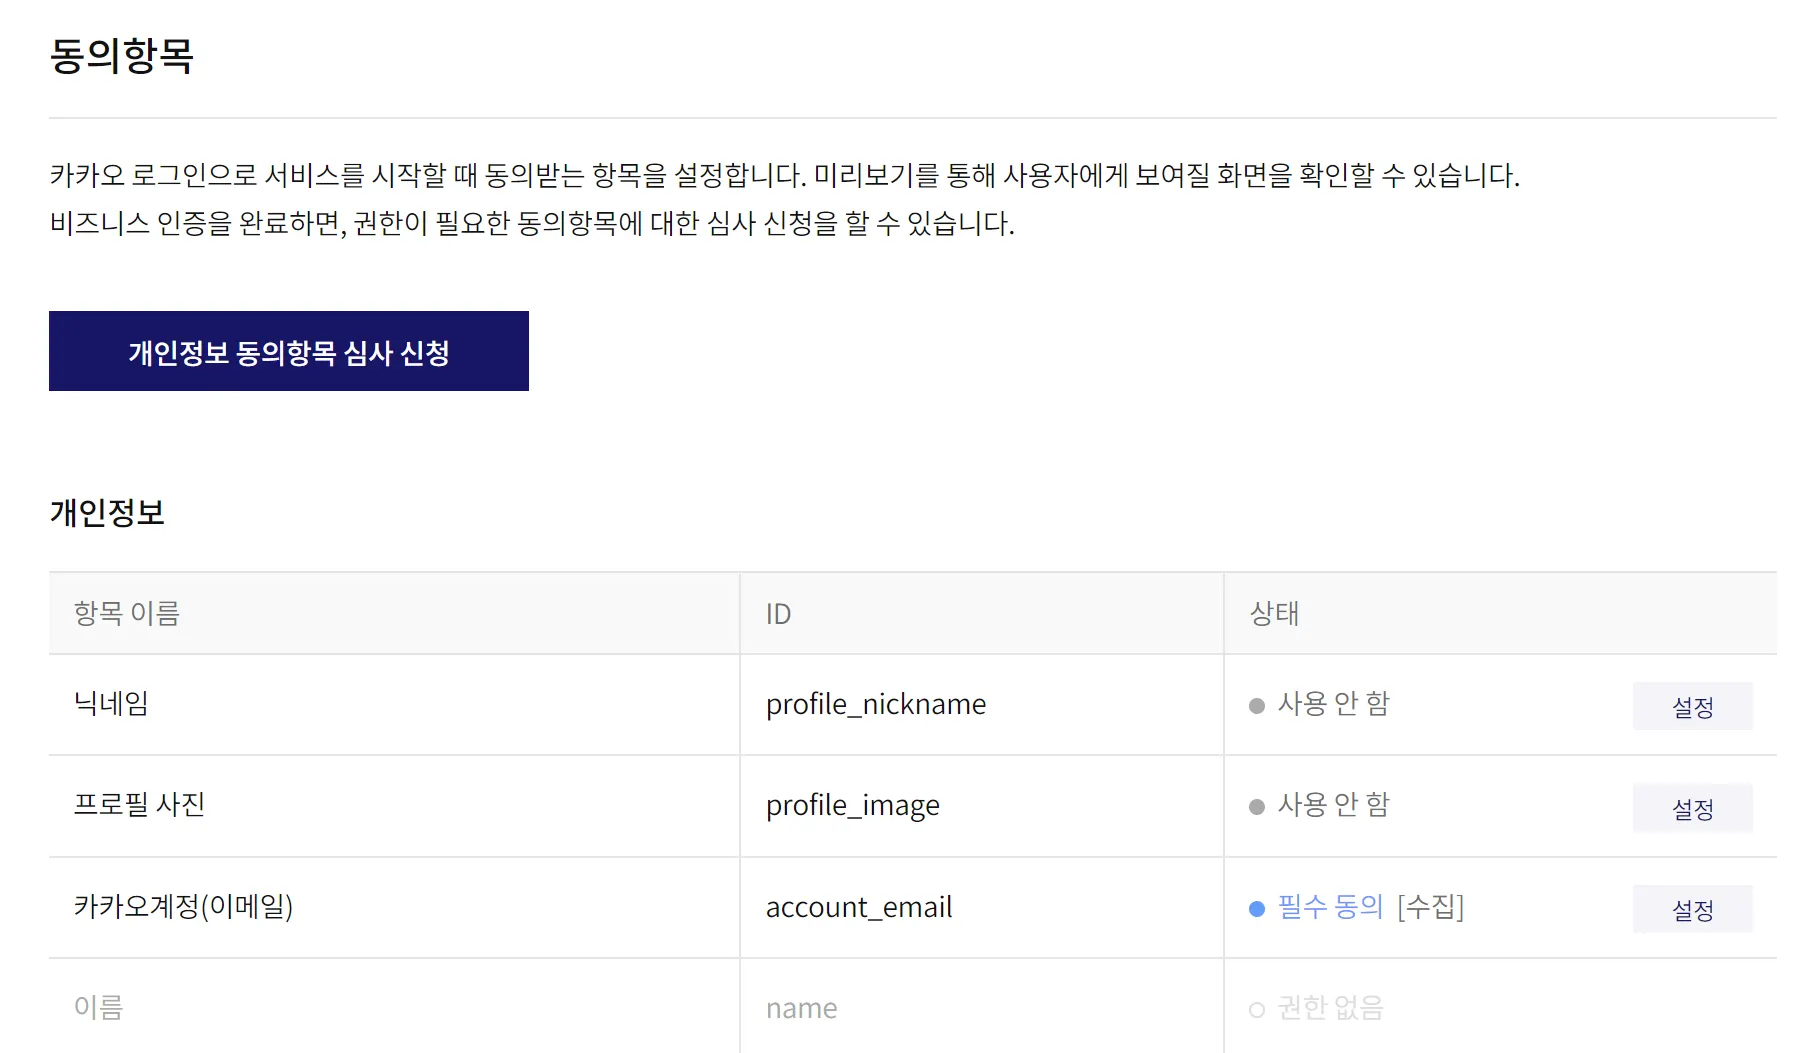
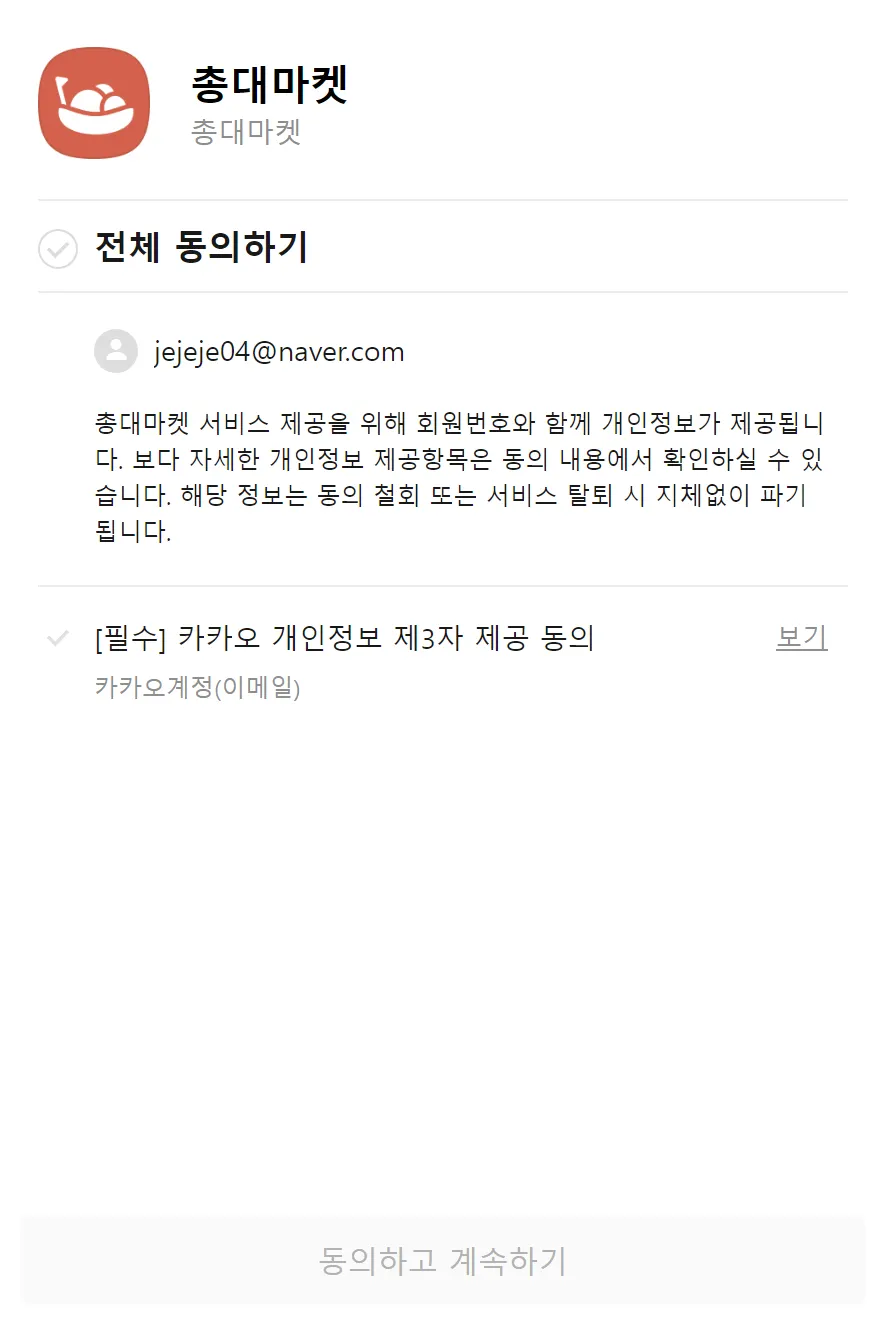
You might have seen a screen like the one above! In this section, if users consent to the provision of their personal information, we will be able to use that information in our Chongdae Market app.
You can configure the settings here to obtain user consent for the personal information they registered with Kakao (such as email, profile picture, gender, birthday, etc.).
3-2. Using kakao SDK in our app
Now that we've completed the preparation to use the Kakao SDK, it's time to integrate it into our project.
First, we need to declare the activity that will handle the Kakao SDK (AuthCodeHandlerActivity). You can add the following code to your AndroidManifest.xml:
<activity
android:name="com.kakao.sdk.auth.AuthCodeHandlerActivity"
android:exported="true">
<intent-filter>
<action android:name="android.intent.action.VIEW" />
<category android:name="android.intent.category.DEFAULT" />
<category android:name="android.intent.category.BROWSABLE" />
<!-- Redirect URI: "kakao${NATIVE_APP_KEY}://oauth" -->
<data android:host="oauth"
android:scheme="kakao${NATIVE_APP_KEY}" />
</intent-filter>
</activity>
XML
복사
Just to clarify, AuthCodeHandlerActivity is not something you create; it’s a class already included in the Kakao SDK. So, avoid the mishap of trying to create it yourself in the com.kakao.sdk.auth package! (Trust me, I've been there, haha!)
Also, for the "kakao${NATIVE_APP_KEY}" part, make sure to use the native app key managed in your local.properties.
Next, declare the Activity that will handle the login process, and use the code below to manage the login:
// 로그인 조합 예제
// 카카오계정으로 로그인 공통 callback 구성
// 카카오톡으로 로그인 할 수 없어 카카오계정으로 로그인할 경우 사용됨
val callback: (OAuthToken?, Throwable?) -> Unit = { token, error ->
if (error != null) {
Log.e(TAG, "카카오계정으로 로그인 실패", error)
} else if (token != null) {
Log.i(TAG, "카카오계정으로 로그인 성공 ${token.accessToken}")
}
}
// 카카오톡이 설치되어 있으면 카카오톡으로 로그인, 아니면 카카오계정으로 로그인
if (UserApiClient.instance.isKakaoTalkLoginAvailable(context)) {
UserApiClient.instance.loginWithKakaoTalk(context) { token, error ->
if (error != null) {
Log.e(TAG, "카카오톡으로 로그인 실패", error)
// 사용자가 카카오톡 설치 후 디바이스 권한 요청 화면에서 로그인을 취소한 경우,
// 의도적인 로그인 취소로 보고 카카오계정으로 로그인 시도 없이 로그인 취소로 처리 (예: 뒤로 가기)
if (error is ClientError && error.reason == ClientErrorCause.Cancelled) {
return@loginWithKakaoTalk
}
// 카카오톡에 연결된 카카오계정이 없는 경우, 카카오계정으로 로그인 시도
UserApiClient.instance.loginWithKakaoAccount(context, callback = callback)
} else if (token != null) {
Log.i(TAG, "카카오톡으로 로그인 성공 ${token.accessToken}")
}
}
} else {
UserApiClient.instance.loginWithKakaoAccount(context, callback = callback)
}
Kotlin
복사
This code is provided in the Kakao login official documentation. Don’t just copy and paste it; make sure to understand the role of each branch and separate the functions for better organization!
Looking at the code above, there are quite a few branches. I read through each line of code and referenced blogs and ChatGPT for parts I didn't understand to grasp the function of each branch.
To understand each branch, it's essential to first comprehend the Kakao login methods. There are two ways to log in to Kakao: through the KakaoTalk app and by displaying a webpage for the user to enter their Kakao account ID and password. The method used depends on whether KakaoTalk is installed on the user's device. Here are the scenarios that dictate which login method is used:
1.
If KakaoTalk is not installed on the user's device, the login attempt will be made using the Kakao account.
2.
If KakaoTalk is installed but not linked to an account, the login attempt will also be made using the Kakao account.
3.
If KakaoTalk is installed and linked to an account, the login attempt will be made through KakaoTalk.
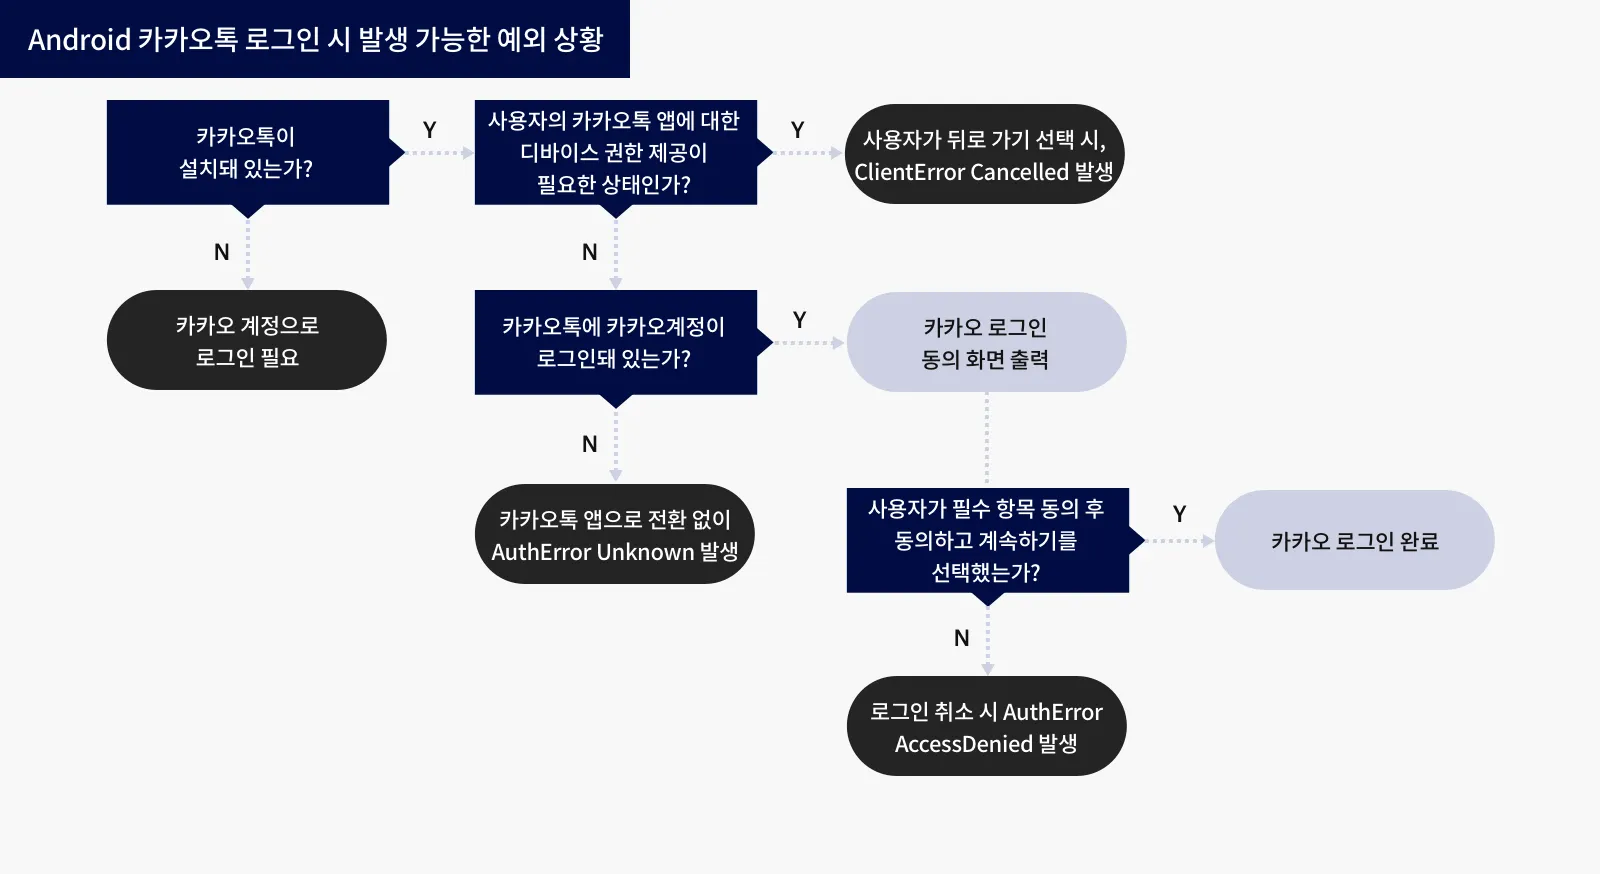
The Kakao official documentation provides helpful comments for each situation, making it easy to understand. Hehe.
UserApiClient.instance.loginWithKakaoTalk(context) { token, error ->
if (error != null) {
Log.e(TAG, "로그인 실패", error)
}
else if (token != null) {
Log.i(TAG, "로그인 성공 ${token.accessToken}")
}
}
Kotlin
복사
If you have successfully logged into Kakao, the Kakao API will create an OAuthToken object, and this object will be passed to the callback function's token parameter. The accessToken property of the OAuthToken object contains the Kakao Access Token, which you can send to the Chongdae Market server. Once you've done that, your job on the client side is done! Now it's the backend developers' turn. The Chongdae Market server will use the Kakao Access Token sent from the client to communicate with the Kakao server and retrieve your Kakao user information.~~
4. Struggles Record
If I had completed this entire process without any hiccups, it would have only taken a few hours. However, in reality, I stayed up all night struggling! There were many steps and a lot of knowledge to grasp, which made me wander around quite a bit. I'll document that here!
However, in reality, I stayed up all night struggling! There were many steps and a lot of knowledge to grasp, which made me wander around quite a bit. I'll document that here!1) What is this AuthCodeHandlerActivity??
While adding the following code to the Manifest to use the Kakao SDK, I encountered a problem.
<activity
android:name="com.kakao.sdk.auth.AuthCodeHandlerActivity"
android:exported="true">
<intent-filter>
<action android:name="android.intent.action.VIEW" />
<category android:name="android.intent.category.DEFAULT" />
<category android:name="android.intent.category.BROWSABLE" />
<!-- Redirect URI: "kakao${NATIVE_APP_KEY}://oauth" -->
<data android:host="oauth"
android:scheme="kakao${NATIVE_APP_KEY}" />
</intent-filter>
</activity>
XML
복사
At first, I assumed that I needed to create the AuthCodeHandlerActivity myself in the com.kakao.sdk.auth path when adding this code.

So I went ahead and added each package one by one, creating my own AuthCodeHandlerActivity like a fool!
I thought, "Now that I've created the activity, I need to put something in it," but I couldn't find any information about it in the official documentation. So, I turned to other blogs for help, but unfortunately, one of those blogs shared incorrect information, which only added to my confusion. (It seems that the author of that blog also mistakenly thought they had to create their own AuthCodeHandlerActivity like I did!)
(It seems that the author of that blog also mistakenly thought they had to create their own AuthCodeHandlerActivity like I did!)Later, with the help of KM, a fellow Android developer from my Wooteco cohort, I discovered that I didn't need to create AuthCodeHandlerActivity myself. Thanks to him, I was able to solve the issue. He's a lifesaver!
2) I need a CI (Client ID) to implement Kakao login, but I can't seem to retrieve it!
This was a concern not just for me, but also for my backend team members.
After the client logs in with Kakao, they send the Kakao Access Token to the server. Initially, the method we planned to implement required this token to include a Kakao CI (Connection Information). At that time, neither I nor my backend teammates were well-versed in the social login flow, so we thought it was essential to have the CI. We believed that each user has a unique Kakao CI, and by sending this to the server, we could create a Chongdae Market account associated with that CI. However...

Huh...? CI (Connection Information) is not authorized??
Later, I found out that CI (Connection Information) can only be obtained if you have a business registration. The data we needed had to be unique for each user to ensure security, meaning it shouldn't be easily guessable by others.
However, aside from CI, there was no other user data that met this requirement. We decided to temporarily use the email, which is unique to each user, but it was still too easy to guess.
While discussing this issue, I happened to have lunch with my coach and K.M., who suggested that we use the Kakao Access Token for the server to communicate with Kakao. By changing the approach to have the server, rather than the client, communicate with Kakao, we gained several advantages:
1.
The Kakao Access Token changes with each login, making it more secure.
2.
There’s no need to collect mandatory user personal information, which makes users feel more at ease when using our service (a minor benefit, but still important!).
Thus, we switched to using only the Kakao Access Token and successfully implemented a secure login system!
3) To send the tokens, we decided to store them in cookies.
After a successful login, the Access Token is used to verify who the user accessing Chongdae Market is. This Access Token is separate from the one associated with Kakao; it's a token generated by Chongdae Market. When the user logs in for the first time, the server sends the Access Token to the client, which then stores it in local storage. The client must send this token to the server with each communication, allowing the server to identify which user is making the request.
The backend team requested that the tokens be sent in cookies. Typically, tokens are sent using HTTP headers, but using cookies enhances security, so we decided to go that route. To be honest, I was a bit overwhelmed by this request because I didn't fully understand what cookies were or the concept of tokens. It looks like I'll need to start studying again! This topic seems long enough to warrant a separate post, so I'll document it in the next one!
This topic seems long enough to warrant a separate post, so I'll document it in the next one!