

SpringBoot와 Web서버로 나누는 이유는 무엇일까?
포케가 생각하는 이유
1.
SpringBoot가 죽어도 또다른 SpringBoot(stand-by)가 서비스 운영을 지속할 수 있게 구성을 변경하기 위해
2.
application.yml 직접 DB에 접근하고, 민감한 정보를 가진 SpringBoot와 DB를 내부망에 두어 외부로부터의 접근을 차단시키기 위해서
3.
SpringBoot에서 ssl 및 기본 로깅까지 적용해버리면 비즈니스 로직과 상관 없는 코드가 많아져서 이를 Web서버를 별도로 운영하여 해결하기 위해
하지만 아래와 같은 이유로 Web / SpringBoot를 분리한다고 함
확장성
Web과 SpringBoot를 별도로 확장시킬 수 있도록 설정할 수 있어 유연하게 대응하고 있음
장애 격리
SpringBoot가 죽어도 Web서버가 살아있는 또 다른 SpringBoot에 요청을 이동시켜 장애가 나지 않도록 할 수 있음
성능 최적화
web서버는 정적파일을 처리하기 최적화되어 있고 was는 비즈니스 로직을 처리하는데 최적화 되어있음 이를 분리함으로써 각자의 역할에 맞게 설정을 분리할 수 있다고 하네요?
어떻게 분리 해야 할까?
아래와 같은 목표로 web서버를 설정하려고 합니다.
•
docker에 nginx를 설정한 후 이를 hostNetwork를 사용하도록 변경
◦
host네트워크를 사용하는 점에서 컨테이너 격리의 이점을 누릴 수는 없지만, 패키지 의존성을 분리할 수 있고 유연하게 업데이트 및 삭제를 할 수 있음
•
nginx 설정 추가
◦
HTTPS 적용
▪
Let’s encrypt로 인증서 발급 및 자동 재발급 처리
◦
SpringBoot서버 2대를 로드벨런싱 처리
◦
그 외 보안설정 적용
▪
server 버전정보 노출 방지
▪
custom 오류페이지 적용 (404, 403, 500, 502)
HTTPS 적용
HTTPS(HTTP + SSL)은 평문전송 프로토콜인 HTTP를 통신구간 암호화를 적용한 프로토콜 조합이다. OSI 7계층을 기준으로 HTTP는 7계층인 어플리케이션 계층이며 비즈니스 로직을 처리하는데 특화되어 있는 반면, 암호화나 인증기능을 제공하지 않는다. 암호화를 적용하기 위해 사용하는 SSL(6,5계층)을 사용하면 HTTP는 더이상 통신 구간 암호화가 적용되었는지 신경쓰지 않아도 된다.
HTTPS 적용하기 위한 준비물
HTTPS를 적용하기 위해선 web서버는 필수는 아니지만 아래와 같은 준비물이 필요하다
1.
도메인 주소
2.
SSL 인증서 및 개인키
도메인 주소는 SSL인증서를 생성할 때 사용하며 이 인증서는 해당 사이트가 신뢰할 수 있는 사이트임을 증명하는데 사용한다.
SSL인증서를 발급했다면 암호화를 적용하기 위해 개인키를 발급해야 한다. 개인키는 비대칭키의 숨겨야 하는 키이며 암호화 통신을 할 때 사용된다. 자세한 내용은 비대칭키 암호화를 공부하면 된다.
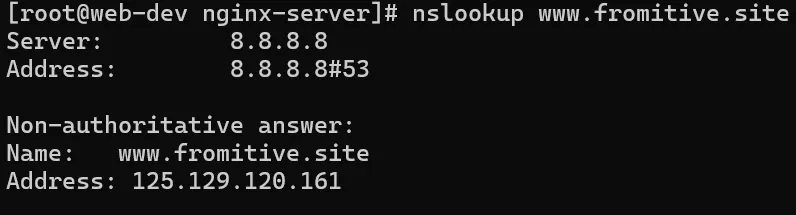
도메인 주소는 이미 있으며 nslookup으로 SSL을 적용할 서버에 잘 설정되었되었는지 확인한다. 아래와 같이 125.129.120.161 처럼 웹서버의 공인 IP가 잘 나오면 오케이다.
다음은 SSL 인증서와 privatekey를 생성해야 한다. 생성해야 할 땐 self-signed를 하지 않고, 신뢰할 수 있는 인증 기관에서 서명한 인증서를 사용해야 한다. 결론은 SSL인증서를 만들땐 돈이든다…
따라서 배고픈 취준생은 Let’s Encrypt를 사용해야 한다.
let’s encrypt로 인증서를 받기 위해선 아래의 과정이 필요하다.
1.
certbot이 인증을 위해 생성한 데이터에 접근할 수 있도록 webroot 디렉터리 설정
2.
nginx에서 webroot 디렉터리에 접근 가능하도록 설정
3.
certbot을 실행시켜 외부의 let’s encrypt서버가 우리 nginx 서버에 통신할 수 있도록 명령어 실행
nginx의 webroot 디렉터리 설정
certbot과 nginx를 host 서버에 설치하지 않고, docker를 이용해서 설치하기 위해선 volume mount를 두 컨테이너가 공유해야 할 필요가 있다.
먼저 인증서를 생성하기 위한 nginx 설정을 생성한다. 디렉터리 구조는 아래와 같다.
nginx-server
|-- certbot.yml
|-- data
| |-- certbot
| | `-- www
| |-- nginx-no-ssl
| | `-- conf.d
| | `-- default.conf
YAML
복사
nginx-server/nginx-no-ssl/conf.d/default.conf 의 내용을 아래와 같이 작성한다.
server {
listen 80;
server_name www.fromitive.site;
location /.well-known/acme-challenge/ {
root /var/lib/letsencrypt/;
}
}
YAML
복사
이렇게 되면 http://www.fromitive.site/.well-known/acme-challenge 요청을 보낼때 /var/lib/letsencrypt 디렉터리에서 .well-known/acme-challenge값을 응답받게된다.
ssl인증서를 받기 위한 docker-compose.yml파일을 작성한다. 파일명은 docker-compose-no-ssl.yml이다.
version: '3'
services:
nginx:
image: nginx:latest
container_name: nginx
ports:
- "80:80"
volumes:
- ./data/nginx-no-ssl/conf.d:/etc/nginx/conf.d
- ./data/certbot/www:/var/lib/letsencrypt
YAML
복사
docker compose로 nginx 컨테이너를 백그라운드로 실행시킨다.
docker-compose -f docker-compose-no-ssl.yml up -d
YAML
복사
certbot 실행
nginx-server디렉터리에 certbot을 실행해서 인증서를 가져오는 certbot.yml파일을 작성한다.
docker compose는 프롬프트 모드를 지원하지 않으므로 --non-interactive --agree-tos -m your-email@example.com를 추가한다.
version: '3'
services:
certbot:
image: certbot/certbot
container_name: certbot
volumes:
- ./data/certbot/etc:/etc/letsencrypt
- ./data/certbot/www:/var/lib/letsencrypt
entrypoint: "certbot certonly --webroot --webroot-path=/var/lib/letsencrypt -d www.fromitive.site --non-interactive --agree-tos -m fromitive@gmail.com"
JavaScript
복사
certbot.yml 파일로 docker를 실행하면 인증서를 획득할 수 있다.
# docker-compose -f certbot.yml up
WARN[0000] /root/nginx-server/certbot.yml: `version` is obsolete
WARN[0000] Found orphan containers ([nginx]) for this project. If you removed or renamed this service in your compose file, you can run this command with the --remove-orphans flag to clean it up.
[+] Running 1/1
✔ Container certbot Recreated 0.5s
Attaching to certbot
certbot | Saving debug log to /var/log/letsencrypt/letsencrypt.log
certbot | Account registered.
certbot | Requesting a certificate for www.fromitive.site
certbot |
certbot | Successfully received certificate.
certbot | Certificate is saved at: /etc/letsencrypt/live/www.fromitive.site/fullchain.pem
certbot | Key is saved at: /etc/letsencrypt/live/www.fromitive.site/privkey.pem
certbot | This certificate expires on 2024-11-09.
certbot | These files will be updated when the certificate renews.
certbot | NEXT STEPS:
certbot | - The certificate will need to be renewed before it expires. Certbot can automatically renew the certificate in the background, but you may need to take steps to enable that functionality. See https://certbot.org/renewal-setup for instructions.
certbot |
certbot | - - - - - - - - - - - - - - - - - - - - - - - - - - - - - - - - - - - - - - - -
certbot | If you like Certbot, please consider supporting our work by:
certbot | * Donating to ISRG / Let's Encrypt: https://letsencrypt.org/donate
certbot | * Donating to EFF: https://eff.org/donate-le
certbot | - - - - - - - - - - - - - - - - - - - - - - - - - - - - - - - - - - - - - - - -
certbot exited with code 0
JavaScript
복사
인증서를 받기 위한 nginx는 종료하고, 컨테이너는 삭제하자.
docker stop nginx
docker remove nginx
JavaScript
복사
nginx 설정파일을 data/nginx-ssl/conf.d/default.conf 에 생성하고 아래와 같이 설정파일을 추가한다.
또한 보안 강화를 위해 서버 버전정보를 안보이게 하고, 오류코드별로 custom 에러페이지가 나타나도록 설정한다.
upstream was_backend {
server 10.0.1.6:8080;
}
server {
listen 80;
server_name www.fromitive.site;
location /.well-known/acme-challenge/ {
root /var/lib/letsencrypt/;
}
location / {
return 301 https://$host$request_uri;
}
}
server {
listen 443 ssl;
server_name www.fromitive.site;
ssl_certificate /etc/letsencrypt/live/www.fromitive.site/fullchain.pem;
ssl_certificate_key /etc/letsencrypt/live/www.fromitive.site/privkey.pem;
ssl_protocols TLSv1.2 TLSv1.3;
ssl_ciphers HIGH:!aNULL:!MD5;
ssl_prefer_server_ciphers on;
server_tokens off;
error_page 400 404 403 409 /custom_40x.html;
error_page 500 502 503 504 /custom_50x.html;
location = /custom_40x.html {
root /usr/share/nginx/html;
internal;
}
location = /custom_50x.html {
root /usr/share/nginx/html;
internal;
}
location / {
proxy_pass http://was_backend;
proxy_set_header Host $host;
proxy_set_header X-Real-IP $remote_addr;
proxy_set_header X-Forwarded-For $proxy_add_x_forwarded_for;
proxy_set_header X-Forwarded-Proto $scheme;
}
}
JavaScript
복사
custom 오류페이지도 아래와 같이 등록하자
cd data/nginx-ssl/error
echo "client error occurred" > custom_40x.html
echo "server error occurred" > custom_50x.html
JavaScript
복사
마지막으로 ssl을 적용한 nginx를 실행할 docker compose를 작성한다.
version: '3'
services:
nginx:
image: nginx:latest
container_name: nginx
ports:
- "80:80"
- "443:443"
volumes:
- ./data/nginx-ssl/conf.d:/etc/nginx/conf.d
- ./data/nginx-ssl/error:/usr/share/nginx/html
- ./data/certbot/www:/var/lib/letsencrypt
- ./data/certbot/etc:/etc/letsencrypt
certbot:
image: certbot/certbot
container_name: certbot
volumes:
- ./data/certbot/www:/var/lib/letsencrypt
- ./data/certbot/etc:/etc/letsencrypt
entrypoint: "/bin/sh -c 'trap exit TERM; while :; do certbot renew; sleep 12h & wait $${!}; done;'"
JavaScript
복사
docker compose를 실행시킨다.
docker compose -f docker-compose-ssl.yml up -d
JavaScript
복사
이렇게 하면 짜잔~ Let’s Encrypt를 사용하여 신뢰할 수 있는 ssl을 적용이 가능하다.
아래는 위의 모든 내용을 담은 설정파일이다.
